tisdag 14 juni 2011

US 105mm Artillery - Part 1

The FoW-bug has bitten me again so yesterday I primed the rest of my infantry and the guns and bases for my 105mm artillery. Working with the airbrush is a joy, makes priming so easy. With the new work room in place, the work gets even easier. To improve my air brush experience I need to build a small stand for the air brushes though, at the moment I have to fiddle around a bit when I refill paint and so on.
Additions to my US Rifle Company
105 mm howitzer has gotten some paint
As always, when the minis has been primed the mold lines that I missed show up. Guess the old file has to work a bit again.

söndag 12 juni 2011

Basing my US Rifle Company - Part 2

The basing material has finally arrived and I have started to base my Rifle Company. Part one can be found here: Basing my US Rifle Company - Part 1


I started out by mixing up green and brown turf. This is the mix that major of the bases will have, the two base shades will be used to break up the pattern a bit.


Pu the base that will get some nice greenery on a piece of paper, this will let you bring up the turf that is not sticking to the base. To stick the turf to the bases, I use PVA/water about 50:50 and I put it on the base with a good old brush and then just sprinkle some turf on it. I let it dry for a bit and then shake the excess off.

Repeat this for the different shades that are going to be used.


When the turf is done, I put some static grass in a few spots. I tried a small sift but it was more difficult and did not produce the result I was looking for. Instead I just stick some grass on to a glue spot and shake it off, holding the base up-side-down to have the grass stand a little bit (at least I imagine it will help).


After this, I go for the foliage in two different shades. To put it on the bases, I use a pair of tweezers, grab the flock, dab in a bit of PVA (not watered down) and then stick it to the base. It might need a little press and squeeze here and there to come out the way you want it.

Final step for these bases is the grass tufts. 

A note on the grass: I bought some "Field Grass" from Woodland Scenics but I am not that happy with it. Very hard to handle since it comes in individual straws and 15mm scale is not very big. Next time I order some miniatures I will try out Silfor's grass tufts (or similar from some other brand) since they seem to be easier to handle: just some glue and stick it to the base. The WS-stuff takes a lot more time, cutting, shaping and so on. If anyone has any ideas to make it look good, please stick a comment below.

lördag 28 maj 2011

Magnetizing predator sponsons

This is how I have magnetized my Rhino-chassis. I have four Rhinos, which can go as Rhinos, Razorbacks or Predators.
What you need:
  • 3 mm magnets
  • 3 mm drill
  • Some sprue
  • Scalpel (optional)
  • Super glue
  • Marker pen (optional)


First, I drill a hole in the sponson and glue a magnet in there. 

Then I cut a piece of sprue to fit on the chassis. I make sure that I cut it down a bit so the sponson can fit. After this, drill a hole in the middle of the sprue (I use a scalpel to make a small dent to guide the drill).

Finally, glue another magnet in the sprue. Make sure that you have the polarity in the correct direction. Easiest way to do this is to let the magnet go on to the sponson, mark it with a marker pen and then use the mark to remember which side goes first in to the hole in the sprue.

Baal Predators, ready to mow down some xeno scum!

Smoke markers

I decided to make some smoke markers, good for 40k when you pop smoke for example.


What I used:
Poker marker

Paper clip

Some aquarium filter thingy

Glue gun

Skull White and a light grey primer
  1. Glue a piece of the paper clip to the poker marker
  2. Take a piece of the plastic filter thingy, glue it to the paper clip. I just wrapped it around and then glued the seam. 
  3. Prime with grey primer, then add some white when it has dried.
The result

torsdag 5 maj 2011

Reinforcements!

A small package arrived in the mail the other day, some 105mm Howitzers for my Rifle Company is here!
I will probably not have time to paint for them for a while, but I can put them together with some hobby-tac and play test them at least.

From Miniature gaming

There was also some hair (as my wife called it) in the parcel, just waiting for the rest of my order and I will finally be able to finish all the basing I have left to do for both my Rifle Company and my Flesh Tearers.
From Miniature gaming

fredag 8 april 2011

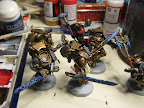
Sanguinary Guard - Update 3

Some haze and highlighting of the edges, pretty happy with it and I don't think I will spend more time on them now. Next I will add some soot effect on the infernus pistol and the jump packs.
From Miniature gaming

torsdag 7 april 2011

Sanguiary Guard - Update 2

Had some time left over, so I sat down and started painting the weapons of the Sanguinary Guard. I found a small tutorial on lightning effects over the Bolter and Chainsword
I didn't have the same colors in stock, so I have used the foundation Necron Abyss, Valljo's Blue, Vallejo's Electric Blue and a white.

The blades were based with the Necron Abyss and then I painted a lightning like pattern with lighter and lighter blue and finished it with a thin white line. To finish them I need to do some highlighting on the edges and the white haze effect mentioned in the tutorial.

From Miniature gaming

From Miniature gaming